
If you’re looking for a quick, healthy, and crave-worthy snack that doesn’t require turning on the oven, you’ve landed in the right place. No bake chocolate oat bars have become a go-to for busy families, fitness lovers, and dessert enthusiasts who want something sweet yet wholesome. These bars combine pantry-friendly ingredients like oats, cocoa, and nut butter into chewy, chocolaty bites that satisfy your cravings and fuel your body.
In this article, we’ll explore what makes these bars special, how to make them step by step, and ways to customize them for gluten-free, vegan, or even high-protein diets. You’ll also discover easy storage hacks, flavor upgrades, and helpful tips to avoid common mistakes. Whether you’re prepping snacks for the week, making treats with your kids, or just need a healthy dessert in a pinch—no bake chocolate oat bars deliver.
What Makes No Bake Chocolate Oat Bars So Popular?
There’s a reason why no bake chocolate oat bars are everywhere—from Pinterest boards to your favorite food blogs. First off, they’re ridiculously simple to make. No fancy equipment, no baking skills, and no oven required. In fact, all you really need is a stovetop or microwave, a mixing bowl, and a pan.
These bars are also super versatile. You can make them with whatever you’ve got in your pantry—rolled oats, nut or seed butter, a bit of cocoa or dark chocolate, and natural sweeteners like honey or maple syrup. They can be made vegan, gluten-free, dairy-free, and even nut-free, depending on your needs.
Best of all? They hit that perfect sweet spot between indulgent and healthy. Packed with fiber, natural fats, and whole grains, they’re the perfect guilt-free treat.
Common Ingredients Used in No Bake Oat Bars
The beauty of this snack lies in its adaptability. While recipes vary, the core ingredients of a no bake chocolate oat bar often include:
| Ingredient | Purpose |
|---|---|
| Rolled Oats | Acts as the base and provides structure |
| Nut Butter | Binds everything and adds creaminess |
| Cocoa Powder | Gives rich chocolate flavor |
| Maple Syrup or Honey | Natural sweetener for moisture and taste |
| Coconut Oil | Adds smooth texture and helps setting |
| Vanilla Extract | Enhances flavor depth |
| Salt | Balances sweetness |
Optional add-ins: chopped nuts, chia seeds, shredded coconut, dried fruit, protein powder, dark chocolate chips.
Each of these components can be swapped or customized, making this recipe a real pantry-cleaner while still being nutritious and satisfying.
Discover more easy ideas like this in our low-carb collection: Keto & Low-Carb Meals
Health Benefits of No Bake Chocolate Oat Bars
Print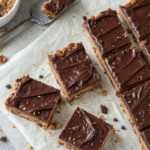
No Bake Chocolate Oat Bars
- Total Time: 1 hour 45 minutes (including chilling)
- Yield: 12 bars
- Diet: Gluten Free
Description
These no bake chocolate oat bars are a wholesome, chewy, and chocolatey treat made with simple pantry ingredients. Perfect for meal prepping snacks, satisfying sweet cravings, or fueling a busy day—without even turning on the oven. They’re rich, naturally sweetened, and customizable for vegan, gluten-free, and other dietary needs.
Ingredients
2 cups rolled oats
1 cup natural peanut butter (or almond/sunflower seed butter)
1/2 cup maple syrup (or honey)
1/3 cup unsweetened cocoa powder
1/4 cup coconut oil (melted)
1 teaspoon vanilla extract
Pinch of sea salt
Optional: 1/4 cup dark chocolate chips, 2 tablespoons chia seeds, 1/4 cup shredded coconut
Instructions
In a medium saucepan over low heat, combine the peanut butter, maple syrup, coconut oil, and vanilla extract. Stir continuously until the mixture is smooth and melted.
Remove from heat and whisk in the cocoa powder and sea salt until well blended.
Add the rolled oats and any optional mix-ins to the warm chocolate mixture. Stir until all oats are evenly coated and the mixture is thick.
Line an 8×8-inch baking pan with parchment paper. Transfer the mixture into the pan and use a spatula or the back of a spoon to press it down firmly and evenly.
Chill in the refrigerator for at least 1.5 to 2 hours, or until firm.
Once set, remove from the pan and cut into bars or squares.
Store in an airtight container in the fridge for up to 10 days or freeze for longer storage.
Notes
For a nut-free version, use sunflower seed butter.
If the bars are too crumbly, add 1 to 2 tablespoons more nut butter.
If too sticky, reduce syrup slightly or chill longer.
Press the mixture tightly in the pan to help bars hold shape.Use cookie cutters to create fun shapes for kids.
- Prep Time: 15 minutes
- Cook Time: 0 minutes
- Category: Snacks, Desserts
- Method: No Bake
- Cuisine: American
Why These Bars Can Be a Nutritious Snack
Despite their dessert-like appearance and rich chocolate taste, no bake chocolate oat bars can be surprisingly nutritious. When made with whole food ingredients, they strike a healthy balance of fiber, protein, and good fats, offering sustained energy without a sugar crash.
Here’s why they’re a smart snack choice:
- Oats are rich in beta-glucan fiber, which supports heart health and helps lower cholesterol.
- Nut butters like almond or peanut butter contain healthy monounsaturated fats and plant-based protein.
- Dark cocoa powder is full of antioxidants like flavonoids, which promote better blood flow and may support brain health.
- Natural sweeteners such as maple syrup or honey provide sweetness without refined sugar.
Unlike processed snack bars, these homemade bars give you full control over ingredients. You can skip preservatives, artificial flavors, and hidden sugars. Instead, you get nutrient-dense bites that satisfy hunger and support your health goals.
Looking for something high-protein and breakfast-friendly? Try our delicious: Cloud Bread Breakfast Sandwich
Comparing No Bake Bars vs. Traditional Baked Bars
You might be wondering: how do no bake chocolate oat bars measure up against the classic baked kind?
Let’s compare:
| Feature | No Bake Chocolate Oat Bars | Traditional Baked Bars |
|---|---|---|
| Prep Time | 10–15 minutes | 30–45 minutes |
| Cooking Requirement | No oven needed | Requires baking |
| Heat-Sensitive Nutrients | Preserved | May degrade under high heat |
| Texture | Chewy, soft, slightly dense | Often firmer or crumbly |
| Customization | Easier to modify ingredients | Less flexible once baked |
| Energy Efficiency | Minimal appliance use | Requires preheating and baking |
No bake bars not only save you time, but they also preserve more nutrients, making them the smart choice for quick meal preps and healthy snacking. Plus, they’re great for summer or busy mornings when you just don’t want to heat up the kitchen.
Step-by-Step Guide to Making No Bake Chocolate Oat Bars

Tools and Prep: What You Need Before Starting
Before diving in, let’s set yourself up for success. One reason no bake chocolate oat bars are such a hit? You don’t need any fancy kitchen tools. Just a few basics and you’re ready to roll.
Essential Tools:
- Medium saucepan or microwave-safe bowl
- Wooden spoon or silicone spatula
- Large mixing bowl
- 8×8 inch baking pan (or silicone mold for easy release)
- Parchment paper (to prevent sticking)
- Measuring cups and spoons
Prep Tips:
- Line your pan with parchment paper before adding the bar mixture—this helps you lift the bars out easily after setting.
- Spray your spatula lightly with cooking oil to prevent sticking while pressing.
- Gather all your ingredients ahead of time. These no bake chocolate oat bars come together fast!
Quick and Easy Recipe Instructions (No Oven Required)
Now for the part you’ve been waiting for—let’s get into how to make no bake chocolate oat bars that are chewy, chocolatey, and so satisfying.
✅ Basic Recipe for No Bake Chocolate Oat Bars
Ingredients:
- 2 cups rolled oats
- 1 cup peanut butter (or almond butter)
- 1/2 cup maple syrup or honey
- 1/3 cup cocoa powder
- 1/4 cup melted coconut oil
- 1 tsp vanilla extract
- Pinch of salt
- Optional: 1/4 cup dark chocolate chips, 2 tbsp chia seeds, shredded coconut
Instructions:
- Melt and Mix Wet Ingredients:
In a medium saucepan over low heat (or microwave), combine peanut butter, maple syrup, coconut oil, and vanilla extract. Stir continuously until smooth and fully melted. - Add Cocoa and Salt:
Take it off the heat and whisk in cocoa powder and a pinch of salt. You want the base for your no bake chocolate oat bars to be silky and rich. - Fold in Oats and Optional Add-Ins:
Stir in the rolled oats until the mixture thickens. Toss in any extras like dark chocolate chips, chia seeds, or coconut to give your no bake chocolate oat bars more flavor and texture. - Press Into Pan:
Pour the oat and chocolate mixture into your parchment-lined pan. Use a spatula to press it down firmly and evenly across the surface. - Chill to Set:
Place your pan in the fridge for at least 1–2 hours. This step is key—no bake chocolate oat bars set as they chill, not cook! - Cut and Store:
Once firm, lift the set slab out of the pan and slice into bars. These no bake chocolate oat bars store beautifully in an airtight container for up to a week in the fridge.
These delicious bars aren’t just easy to make—they’re incredibly flexible too. Swap in sunflower seed butter for a nut-free version, or add dried cranberries for a tart punch.
Whether you’re packing a school lunch, prepping for the gym, or just want something sweet without guilt, no bake chocolate oat bars are the perfect make-ahead treat.
You’ll want to keep this recipe on hand for any time cravings strike. And the best part? You don’t even have to turn on the oven.
Ingredient Substitutions for Dietary Needs
Making Vegan No Bake Chocolate Oat Bars
Vegan diets eliminate all animal-derived ingredients, but that doesn’t mean missing out on dessert. No bake chocolate oat bars are naturally easy to make vegan with a few simple swaps.
Vegan Ingredient Swaps:
- Sweetener: Use pure maple syrup or agave nectar instead of honey.
- Chocolate: Choose dairy-free chocolate chips or unsweetened cocoa powder.
- Nut Butter: Most nut butters are vegan, but double-check for added dairy.
- Binding Agents: Coconut oil and nut butter work perfectly together to hold your vegan bars without eggs or gelatin.
These vegan-friendly no bake chocolate oat bars are just as rich, chewy, and indulgent as the classic version. And since they’re plant-based, they’re suitable for more people with dietary restrictions. Serve them up at parties or pack them as workday snacks—everyone will love them.
Don’t miss our full collection of plant-based snacks here: Dairy-Free & Vegan
How to Make Gluten-Free Variations
If you or a loved one has gluten sensitivity or celiac disease, the good news is you can still enjoy no bake chocolate oat bars with a few tweaks.
Tips to Keep It Gluten-Free:
- Certified Gluten-Free Oats: Not all oats are gluten-free due to cross-contamination. Look for oats labeled “certified gluten-free.”
- Check Your Add-Ins: Ingredients like chocolate chips, coconut flakes, and nut butters can sometimes contain gluten from processing or additives. Always read labels.
- Flavor Enhancers: Add gluten-free vanilla extract, cinnamon, or shredded coconut for more depth.
When made properly, gluten-free no bake chocolate oat bars taste no different than their traditional counterparts. They remain chewy, chocolatey, and totally crave-worthy.
Gluten-Free & Vegan Combo?
Yes, it’s absolutely possible to make bars that are both vegan and gluten-free. Use:
- Certified gluten-free oats
- Maple syrup
- Plant-based chocolate
- Coconut oil or vegan butter
This version is ideal for potlucks, bake sales, or as a universal family treat that fits nearly every diet type.
Looking for more healthy snack swaps like this? Try: Keto & Low-Carb Meals
Tips to Perfect Your No Bake Chocolate Oat Bars
How to Get the Right Texture Without Baking
One of the most common challenges when making no bake chocolate oat bars is getting that perfect chewy-but-firm texture. Since there’s no oven involved, you’ll rely on your ingredient ratios and chilling technique to get it just right.
Here’s how to master it:
- Use the Right Oats: Stick with old-fashioned rolled oats. Instant oats can turn mushy, while steel-cut oats stay too hard. Rolled oats provide the ideal chewiness.
- Melt Evenly: Ensure that your wet mixture—usually nut butter, sweetener, and coconut oil—is fully melted and well-combined before adding the oats. This ensures even coating and bonding.
- Pack Tightly: When pressing the mixture into your pan, use a spatula or flat-bottomed glass to press down firmly. This prevents the bars from crumbling after chilling.
- Chill Long Enough: Give the bars at least 2 hours in the fridge or 30 minutes in the freezer before slicing. Rushing this step leads to soft, messy bars.
- Slice Carefully: Use a sharp knife and clean it between slices to avoid sticking or uneven cuts.
These steps will help you get no bake chocolate oat bars that hold their shape and feel satisfying with every bite.
Avoiding Common Mistakes (Crumbly, Too Sticky, etc.)
Even easy recipes can go sideways. Here are some of the most common issues with no bake chocolate oat bars and how to fix them.
| Problem | Cause | Fix |
|---|---|---|
| Bars fall apart | Not enough binder (peanut butter/coconut oil) | Add 1–2 more tablespoons of nut butter |
| Bars too sticky | Too much syrup or not enough chilling time | Reduce liquid or extend chilling |
| Bars taste bland | Not enough salt or flavor enhancers | Add sea salt, cinnamon, or vanilla extract |
| Mixture too dry | Oats not fully coated with wet mix | Warm the wet mix more thoroughly |
| Difficult to slice | Bars not chilled enough or too thick | Chill longer and use a hot knife to slice |
The good news? No bake chocolate oat bars are highly forgiving. A minor adjustment in ratio or chill time is usually enough to fix most texture issues.
Pro Tip: If your bars don’t set the first time, roll the mixture into energy balls. Same flavor, same nutrition, zero waste.
How to Store and Serve No Bake Chocolate Oat Bars
Best Ways to Store for Freshness and Shelf Life
Once you’ve made a batch of no bake chocolate oat bars, proper storage is key to maintaining their texture, flavor, and freshness. Since they’re made without preservatives, they need the right conditions to stay delicious.
Short-Term Storage (Refrigerator):
- Place the sliced bars in an airtight container.
- Separate layers with parchment paper to prevent sticking.
- Store in the refrigerator for up to 7–10 days.
- Bars will remain firm, chewy, and ready to eat straight from the fridge.
Long-Term Storage (Freezer):
- Wrap individual bars in parchment or wax paper.
- Place wrapped bars in a freezer-safe bag or container.
- Freeze for up to 3 months.
- To enjoy, just let one sit at room temperature for 10–15 minutes, or defrost in the fridge overnight.
By keeping your no bake chocolate oat bars cold, you extend their life and preserve the richness of the chocolate without melting.
Pro Tip: Avoid storing them at room temperature unless it’s a cool day. The coconut oil and nut butter base can soften and make the bars lose shape in heat.
Fun Serving Ideas and Occasions to Use These Bars
No bake chocolate oat bars aren’t just for snack time. They’re super versatile and can be served at a range of events or meal moments.
Here’s how to enjoy them creatively:
| Occasion | Serving Idea |
|---|---|
| Breakfast on the Go | Pair with a banana and coffee for quick fuel |
| Kids’ Lunchboxes | Cut into fun shapes using cookie cutters |
| Post-Workout Snack | Add protein powder to the mix |
| Dessert Platter | Drizzle with melted dark chocolate |
| Party Treats | Sprinkle with sea salt or shredded coconut |
| Camping or Hiking | Wrap bars individually for a portable snack |
Whether you’re at home or on the move, no bake chocolate oat bars offer a mess-free, energy-boosting, and utterly satisfying option. Their chewy texture and deep cocoa flavor make them a hit with kids and adults alike.
And if you’re planning a healthy dessert spread? These bars are a crowd-pleaser. You can even layer them with nut butter frosting or dip half of each bar in melted dark chocolate for a gourmet twist.
Creative Twists on Classic No Bake Chocolate Oat Bars

Add-In Ideas: Nuts, Fruits, Seeds, and More
One of the best things about no bake chocolate oat bars is how easily you can customize them. Whether you’re after a nutritional boost or just a new taste, add-ins allow you to keep things interesting.
Here are some tried-and-true options:
Nutty Additions:
- Chopped almonds, pecans, or walnuts for crunch
- Cashew butter or hazelnut spread instead of peanut butter
Fruity Flavors:
- Dried cranberries or cherries for a tangy bite
- Raisins or chopped dates for natural sweetness
- Freeze-dried strawberries for a fruity twist without moisture
Seeds & Superfoods:
- Chia seeds for omega-3s and texture
- Flaxseeds for fiber and healthy fats
- Hemp hearts for protein and nuttiness
Sweet Touches:
- Dark chocolate chips or white chocolate chunks
- Mini marshmallows for a rocky-road vibe
- Coconut flakes for tropical flavor
Each of these can be folded into the base mixture before pressing into the pan. Just don’t overdo it—about 1/2 to 3/4 cup of extras total keeps the consistency right.
Flavor Variations to Try (Peanut Butter, Coconut, Mint, etc.)
Why stick to just one version when you can create endless variations of no bake chocolate oat bars? Here are some popular and delicious spins on the classic.
1. Peanut Butter Lovers’ Bars
Use crunchy peanut butter, swirl in a bit more on top before chilling, and finish with a sprinkle of chopped peanuts.
2. Coconut Chocolate Oat Bars
Mix in unsweetened shredded coconut and top with toasted coconut flakes for texture and a light tropical flair.
3. Mint Chocolate Oat Bars
Add 1/4 tsp peppermint extract to the melted mixture and top with crushed mint candies or chocolate mint chips.
4. Espresso Cocoa Bars
Add 1 tsp of instant espresso powder to the cocoa mix for a mocha-style bite that’s great for adults.
5. Banana Chocolate Oat Bars
Mash in 1 ripe banana with the wet ingredients for a naturally sweet, extra-moist version.
You can even combine themes, like mint-coconut or espresso peanut butter, to suit your personal cravings. These creative tweaks make your no bake chocolate oat bars anything but boring.
Once you find your favorite combo, consider doubling the batch—it’s hard to eat just one.
Kids and Family-Friendly Snack Ideas

Making No Bake Chocolate Oat Bars with Kids
If you’ve got kids at home, making no bake chocolate oat bars together is not just easy—it’s a fun, hands-on kitchen activity. Since there’s no oven involved, it’s safe for little helpers, and you can let them personalize their own bars.
Kid-Friendly Tasks:
- Measuring and pouring oats and dry ingredients
- Stirring the melted chocolate mixture (with supervision)
- Pressing the mixture into the pan
- Sprinkling toppings (like mini chocolate chips, rainbow sprinkles, or coconut)
Fun Tip: Let your kids use cookie cutters to shape the bars into stars, hearts, or animals once they’ve set. It makes snack time feel special, and they’re more likely to eat what they helped make.
These no bake chocolate oat bars also provide wholesome energy and can be made less sweet if you’re mindful about sugar intake.
Healthy School Snacks and After-School Energy Boost
Whether you’re packing lunch or prepping for after-school chaos, no bake chocolate oat bars are a go-to solution. They travel well, don’t need refrigeration for short periods, and satisfy that late-afternoon hunger spike.
Why They Work for School:
- Nut-free versions can be made with sunflower seed butter
- Cut into small squares for toddler hands or large bars for older kids
- Add-ins like oats, seeds, and dried fruit make them more nutrient-dense than store-bought bars
| Snack Time Scenario | Bar Variation to Try |
|---|---|
| School Lunchbox | Plain oat-chocolate version, no allergens |
| Post-Sports Practice | Add protein powder and peanut butter |
| Midday School Snack | Mini bar bites with raisins or cranberries |
| Weekend Family Picnic | Tropical version with coconut and banana |
Pro Parent Hack: Wrap individual bars in wax paper, write fun messages on them, and toss them into lunchboxes. You’ll surprise your kids and keep them smiling through the day.
Making no bake chocolate oat bars a regular part of your family’s snack rotation means fewer store runs, fewer additives, and more wholesome fun at home.
Comparing Top Recipes from Around the Web
What Makes the Best No Bake Chocolate Oat Bar Recipe Stand Out
There are dozens of variations of no bake chocolate oat bars online—from minimalist 3-ingredient versions to elaborate superfood-packed recipes. But what separates the good from the great?
Here’s what standout recipes tend to share:
- Balanced Texture: The best bars strike a perfect balance between chewy and firm. This comes down to the right oat-to-liquid ratio and proper chilling time.
- Flavor Harmony: They don’t overdo the sweetness or cocoa. Recipes that mix salt, vanilla, and just the right sweetener stand out.
- Ingredient Clarity: The best guides are simple, using pantry staples without complicated steps or rare ingredients.
- Customizable Base: A solid base recipe that invites variations—like swapping nut butters, adding seeds, or mixing in dried fruit—tends to rate highest among readers.
Some top food bloggers also test freezing, travel-friendliness, and kid approval—all essential if you’re using no bake chocolate oat bars in real life.
Reader Favorite Recipes and Reviews
Based on recipe roundups, Pinterest saves, and blog comments, these are the crowd-pleasers:
- Minimalist Baker’s Chocolate Oat Bars: Loved for their 4-ingredient simplicity and deep cocoa flavor.
- Sally’s Baking Addiction No Bake Bars: Popular for their balance between sweet, salty, and rich texture.
- Ambitious Kitchen Vegan Version: Praised for being protein-packed and dairy-free with coconut oil and maple syrup.
While your homemade version can borrow inspiration from these, don’t hesitate to tweak to taste. Your kitchen, your rules.
If you want to craft your own no bake chocolate oat bars to match your lifestyle, just follow our step-by-step guide above. You’ll get a bar that stands up to any viral recipe and wins over every snack lover in the house.
Can I make these bars vegan or gluten-free?
Absolutely. No bake chocolate oat bars are incredibly adaptable. For a vegan version, use maple syrup instead of honey, plant-based chocolate chips, and ensure your nut butter doesn’t contain dairy. For a gluten-free option, use certified gluten-free oats and double-check all packaged ingredients for hidden gluten. You can even make bars that are both vegan and gluten-free without sacrificing taste or texture.
How long does it take to prepare and set these bars?
Prep time is quick—just 10 to 15 minutes, and that includes measuring and mixing. Once the bars are pressed into the pan, they need to chill in the fridge for at least 1 to 2 hours. For quicker results, pop them in the freezer for 30 minutes. That’s it. You’ll have firm, chewy no bake chocolate oat bars ready to enjoy in under two hours from start to finish.
How should I store no-bake chocolate oat bars?
For best results, store the bars in an airtight container in the refrigerator. They’ll stay fresh for up to 10 days. If you want to make a larger batch, wrap individual bars in parchment paper and freeze them. They’ll last up to 3 months in the freezer. When ready to eat, thaw in the fridge or at room temperature for a few minutes.
Whether you’re a busy parent, a student needing a midday pick-me-up, or just someone with a sweet tooth and no oven access, no bake chocolate oat bars are the answer. They’re simple to make, endlessly customizable, and packed with both nutrition and flavor.
You’ve now got the tools to:
- Make a base batch in minutes
- Customize for vegan or gluten-free diets
- Store them the right way
- Keep kids engaged and well-fed with creative versions
So go ahead—skip the oven and say hello to one of the easiest, most satisfying snacks you’ll ever make.
Looking for real-time inspiration and tips? Follow Hearthy Meals on Facebook for weekly healthy recipes, kitchen hacks, and comforting meal ideas.
Looking for inspiration? Try more healthy comfort food ideas here: Keto & Low-Carb Meals
Table of Contents